Pages

Wednesday, September 29, 2021

Christmas Card Workshop - So Many Options

 The class for Sunday, October 3, makes 27 cards, 9 each of three patterns.

The supply fee is $30 and customized to your needs. The basic supplies needed are: 

  • card bases and envelopes
  • 2 coordinating pieces of coordinating patterned paper
  • 1 piece of white/neutral cardstock
  • adhesive
  • stamps (in person can use mine)
  • ink (in person can use mine)
  • adhesive (could be part of your supply fee)
You will also need the following to participate online:
  • a Thin Cut die for shaker cards (circle, star, heart, or the Stitched Square Frame Thin Cuts)
  • a die cut machine
  • paper trimmer
Optional items to dress up your cards are:

RIBBON
use glue dots to attach

STICKLES AND/OR LIQUID PEARLS
Did you notice they are now available in bundles?


Cards are easily make into SHAKERS!
  • foam and acetate shapes to match your Thin Cuts
  • loose sequins
  • additional cardstock or glitter paper for the top edge


SHIMMER BRUSH


EMBOSSING
  • anti-static pouch
  • VersaMark ink pad
  • embossing powder
  • heat tool


BLING!


I'd love to see what ideas you have! 

Wednesday, September 15, 2021

Make it Shine! - CTMH Technique Blog Hop


Welcome to The Scrap Buzz! For this month’s Technique Blog Hop we will Make It Shine! You may have arrived from visiting Lauren Moore's page; or, if you just stumbled in, hop from blog to blog using the links to see all of the ideas and art work. If you get lost or find any broken links, a full list of participants is on Melissa Robinson's blog.

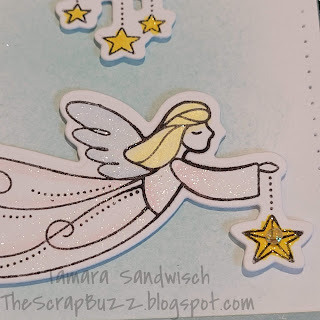
Let Me Show You How to add shine to any artwork. I took this card from the September/October catalog and made a few adjustments. Did you know...that you can find the recipes for all the catalog artwork? Here is the link for the September/October catalog.


This stamp set is called Peace and Love. I think it will be good for not only Christmas, but babies, get well, sympathy and even Valentine's with that cute heart! 

The first thing I did was to replace the Evergreen Cardstock with Evergreen Glitter Paper. Easy Peasy, right? We have 15 colors of glitter paper and I love that it doesn't shed glitter everywhere! It also works great with die cutting and Cricut. TIP:  Don't use a brand new Cricut mat with glitter paper.


I think the catalog card used Watercolor Paints for the background. I'm still working on my skill set for that technique so I used a sponge with Glacier Ink.  Next, instead of using a Waterbrush to blend the Watercolor Pencils, I used Shimmer Brushes! Did you know you could do that? I used Lemonade on the stars and Clear everywhere else. Exciting News:  shimmer brushes will start to come labeled with the name of the color; YIPPEE!!


It's a little tricky to photograph shimmer. I hope you can see on some of these pictures how much it sparkles.


There were a couple of other changes I made. Instead of a sewing machine, I used my Piercing Tool and the technique shown in the White Pines Scrapbooking kit. I made a video class for that workshop and you can find it in my Virtual Craft Room on Facebook.

I played with the Autumn Loose Sequins and discovered a few things about the new Loose Gems (clear gems are in this collection).

 I used the Micro Glue Dots to attach the Clear Loose Gems. Depending on which way you place them, they do offer different looks.


With the point down, they look clear.


With the point up (easier to attach), they are opalescent. I put mine point up. Watch for more Autumn Sequin info on my Facebook page.

I used Thin 3-D foam tape to raise the Evergreen layer, the cloud and the angel. The sentiment is flat but the gems are the same height as the cloud and angel.


If you need a consultant, you can contact me for help and/or shop from my website.

Please leave a comment below before hopping over to see more Shiny art from Maz Wood.