Showing posts with label Christmas. Show all posts

Thursday, September 12, 2024

All the details: Paper Pumpkin Special

Right now new subscribers have a unique opportunity to try paper pumpkin at a 40% discount!

If you're not familiar with this monthly subscription  treat, click here to learn more.

This deal is for NEW subscribers, for ONE kit (October) only.  After that, if you do not cancel your subscription, you will automatically be sent the next kit in November (which looks awesome, by the way!).  The regular subscription price is $25/month and that INCLUDES shipping.  There is also a way to pre-purchase Paper Pumpkin kits, but that doesn't apply to this deal.  I will share more about pre-purchasing kits at a later date.

This kit makes 10 cards:  5 each of 2 different designs.  It includes coordinating envelopes (these are always extra fun!).  The cards have a tri-fold base that can be used to frame a photo. The cards are pre-printed with green fold.  Precut, grosgrain ribbon is the embellishment.  There are precut labels, which also have green foil.  The kit includes a Shaded Spruce Stampin' Spot (and a sample block for new subscribers).  That's a LOT of info for your surprise box!!  

With the 40% off, your cards will be less than $2 each!  

Here is how you subscribe:

  • Click on this link to go to the Paper Pumpkin website and sign up.
    • You will need to create an account.  This is a DIFFERENT login than for Stampin' Up.
    • Enter your address and payment info.
  • Enter the code "HOLIDAY40" in the Prepaid/Promo Code box and click APPLY.
    • You should see your total adjust for the 40% off.  Tax will be added if applicable.
  • Click SUBSCRIBE.


Credit card charges are run between the 10th and the 20th. You will receive an email receipt.  For September, mine came today.

Kits start shipping on the 20th of the month via USPS.  You will receive another email when your kit shipped, including tracking info.

Enjoy your kit when it arrives!!  You can make the cards as designed with the enclosed directions, create your own project, or follow ideas for alternative projects. 

You can follow the Paper Pumpkin facebook page for ideas. They do a LIVE on the last Tuesday of the month showing the kit and alternative ideas.  They will also email the link for the Facebook Live.  You will be amazed at what people come up with using these kits! 

Monday, September 2, 2024

Check out the new Mini Catalog!

The products in the September-December Mini Catalog will become available at 12:01 am MST on Wednesday, September 4, 2024.  In addition to the printed catalog, there is a companion Digital Catalog featuring the new Scrapbooking products from Stampin' Up!  These products are made with DSP, CS, and other SU! products to coordinate with the Suite Collections in the new Mini Catalog, but are designed after the Close To My Heart style scrapbooking workshops.


The products in the annual catalog will continue and you can find additional products that are Online Exclusives.  Remember that two new kits are introduced every month! 

If you have any questions about availability, please don't hesitate to contact me.  I can look up the expected back in stock date for products and let you know when they are available to order, or order for you.


To view, print, and/or download either the Mini Catalog or the supplement, go to my website and scroll down to the bottom where you will see the current catalogs to view and/or download.  
 

Tuesday, March 14, 2023

Stash Busting 101

Are you always on the hunt for card and/or scrapbook patterns?  Would you like FREE patterns?!  How about FREE patterns WITH cutting guides?!?!

You can go to my website anytime and download the Workshop patterns and directions.  Current products have the downloads located with the product kit. You can even directions for retired kits here. If you need directions for a product not shown, just LMK.

You don't need to purchase a workshop kit in order to download the directions. If you DO purchase a kit, you can find the instructions linked in your order history.

  1. Login to my website.
  2. Click on your name and go to ACCOUNT.
  3. Click on ORDER HISTORY.
  4. Click on the page icon to the right of the order.
  5. Click on the red DOWNLOAD... line.
  6. From there you can view, save, or print the directions.
Tip:  If I'm going to use different papers, I often make a note of which is which before cutting. I may even use colored pencils to make a visual reminder. (Sometimes I color them just to keep the front and back sides more obvious.)


Here is the layout I made using the design for one of the double page spreads from It's the Little Things scrapbooking workshop kit.  I substituted almost all of the products originally used (see below for list).

You can use the designs offered by CTMH for inspiration and to bust your stash of craft supplies.  It's much easier for me to find an item that's a close substitute than to start from scratch.  You'll see in this layout that I even used word stickers, hearts, and flowers like in the original.

I used some REALLY old products on this layout!  What is the oldest CTMH item you have in your stash??


Here's a video about this layout.

CC12313 It’s the Little Things Scrapbooking Workshop Kit

        It's the Little Things Paper Packet --->  CC10203 Holiday Stack

                                           X9009 Mix In (retired)

        It's the Little Things Scrapbooking Stickers  --->  stickers from Silver & Gold Complements (retired)

        It's the Little Things Scrapbooking stamp set  --->  

                            C1800 Holly Jolly - Cardmaking (retired)

                                       CC9226 Hello Fabulous S+TC 

                            Z4240 Oh What Fun - Cardmaking S+TC (retired)

                            Z3698 Stiched Florals S+TC (retired)

        It's the Little Things Die-Cuts  --->  silver glitter die cuts from Silver & Gold Complements (retired)

        White (& Black) cardstock

        Photo Placeholders

Additional Items:

Z4189 Intense Black Stamp Pad  --->  Evergreen Stamp Pad

Z6510 Nectarine Stamp Pad  ---->  Candy Apple Stamp Pad

Z6517 Lemonade Stamp Pad  ---->  Peach Stamp Pad

Z4580 Quicksilver Metallic Paint Markers  --->  Spectrum Noir Metallic - Precious Metals (retired)

Z4634 Black & White Dots  --->  Ponderosa Pine Big Brads (retired)

Z4572 Blending Brushes

Z4606 1” Masking Tape

Z697 Round Sponge  --->  Sponge Daubers  

Z2089 Glue Dots - Micro Dots  ---> Dual-tip Permanet Glue 

Y1003 2” x 2” My Acrylix Block

Z4643 T-Square Ruler

Paper Trimmer

Scissors

Adhesive

Wednesday, September 29, 2021

Christmas Card Workshop - So Many Options

 The class for Sunday, October 3, makes 27 cards, 9 each of three patterns.

The supply fee is $30 and customized to your needs. The basic supplies needed are: 

  • card bases and envelopes
  • 2 coordinating pieces of coordinating patterned paper
  • 1 piece of white/neutral cardstock
  • adhesive
  • stamps (in person can use mine)
  • ink (in person can use mine)
  • adhesive (could be part of your supply fee)
You will also need the following to participate online:
  • a Thin Cut die for shaker cards (circle, star, heart, or the Stitched Square Frame Thin Cuts)
  • a die cut machine
  • paper trimmer
Optional items to dress up your cards are:

RIBBON
use glue dots to attach

STICKLES AND/OR LIQUID PEARLS
Did you notice they are now available in bundles?


Cards are easily make into SHAKERS!
  • foam and acetate shapes to match your Thin Cuts
  • loose sequins
  • additional cardstock or glitter paper for the top edge


SHIMMER BRUSH


EMBOSSING
  • anti-static pouch
  • VersaMark ink pad
  • embossing powder
  • heat tool


BLING!


I'd love to see what ideas you have! 

Wednesday, September 15, 2021

Make it Shine! - CTMH Technique Blog Hop


Welcome to The Scrap Buzz! For this month’s Technique Blog Hop we will Make It Shine! You may have arrived from visiting Lauren Moore's page; or, if you just stumbled in, hop from blog to blog using the links to see all of the ideas and art work. If you get lost or find any broken links, a full list of participants is on Melissa Robinson's blog.

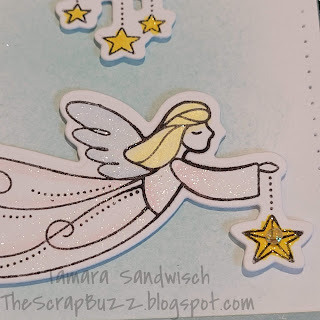
Let Me Show You How to add shine to any artwork. I took this card from the September/October catalog and made a few adjustments. Did you know...that you can find the recipes for all the catalog artwork? Here is the link for the September/October catalog.


This stamp set is called Peace and Love. I think it will be good for not only Christmas, but babies, get well, sympathy and even Valentine's with that cute heart! 

The first thing I did was to replace the Evergreen Cardstock with Evergreen Glitter Paper. Easy Peasy, right? We have 15 colors of glitter paper and I love that it doesn't shed glitter everywhere! It also works great with die cutting and Cricut. TIP:  Don't use a brand new Cricut mat with glitter paper.


I think the catalog card used Watercolor Paints for the background. I'm still working on my skill set for that technique so I used a sponge with Glacier Ink.  Next, instead of using a Waterbrush to blend the Watercolor Pencils, I used Shimmer Brushes! Did you know you could do that? I used Lemonade on the stars and Clear everywhere else. Exciting News:  shimmer brushes will start to come labeled with the name of the color; YIPPEE!!


It's a little tricky to photograph shimmer. I hope you can see on some of these pictures how much it sparkles.


There were a couple of other changes I made. Instead of a sewing machine, I used my Piercing Tool and the technique shown in the White Pines Scrapbooking kit. I made a video class for that workshop and you can find it in my Virtual Craft Room on Facebook.

I played with the Autumn Loose Sequins and discovered a few things about the new Loose Gems (clear gems are in this collection).

 I used the Micro Glue Dots to attach the Clear Loose Gems. Depending on which way you place them, they do offer different looks.


With the point down, they look clear.


With the point up (easier to attach), they are opalescent. I put mine point up. Watch for more Autumn Sequin info on my Facebook page.

I used Thin 3-D foam tape to raise the Evergreen layer, the cloud and the angel. The sentiment is flat but the gems are the same height as the cloud and angel.


If you need a consultant, you can contact me for help and/or shop from my website.

Please leave a comment below before hopping over to see more Shiny art from Maz Wood.


Tuesday, December 15, 2020

Blissful Brackets - CTMH Technique Blog Hop


Welcome to December’s Technique Blog Hop. This month we are focusing on brackets. If you stumbled upon us, just click the links to hop from post to post until you end up here again. The complete list of participants can be found HERE.

If you’ve come from Brandi’s Blog, you’re in the right place.

It’s been quite a while since I participated in this hop. We went a little over-board with the go home idea and have been driving between Oregon and Ohio to finish a major remodel on an old house. That sale closed last week and now a family has a new home for Christmas! And we also decided to move back home to Ohio. After several months of living with relatives, we may have a new address in the new year.

Right now, most of our stuff is still packed. We couldn’t find warmer clothes so I had to do some shopping for coat, gloves, boots. The winter weather is different in Ohio than Oregon! I have more supplies unpacked than clothes, but still can’t seem to find the “one thing” I need. Here’s the card I made:


Brackets are a popular shape and pop up in a lot of different places, like this sticker from the Jingle Joy suite!

.

There are also quite a few bracket shapes in the Close To My Heart Cricut Collections. I pulled in several while I was planning my project, and even used Design Space to design this card. This is a 5x7 card. Here’s is the DS link for my file:  


I used Diamond Stickles to spice up the Raspberry strip. This technique is taught in the Jingle Joy Cardmaking workshop. 


The sticker was “unstuck” with the Anti-Static pouch and popped up with Thin 3-D Foam Tape. The regular thickness might have given it better dimension, so I went around the edge with Green Stickles. Since it was already attached, I slid the All-Purpose mat under the edge to protect the rest of my card.


If you don't have a Close To My Heart Maker (Consultant), you can shop from my website.

.

Perhaps you will see some of these other brackets during the hop. They gave me ideas for other projects. One of my favorite Cricut cuts this time of year is the gift card holder. The yellow shape is the gift card holder. The black rectangle represent a regular (credit card) size gift card. 


When I first used this shape, I wasn’t sure how to fold and glue it. The W diagram shows how to fold it. Put adhesive in between the two middle sections, just at the bottom edge(s) near the front and back sections. There needs to be space to slide in the gift card.


Making gift tags can be faster, simpler, and easier with brackets! Whether layered or not, just cut a sheet of these shapes then stamp “to” and “from.” 

These are standard size cards with a bracket cut out. I made 3x4 and 3.5x5 black rectangles to represent photos. You can use these cards when featuring a picture on your Christmas cards. Remember, you can always adjust the size of the opening, or the card itself, to fit you photo.

Please leave a comment before continuing to see what Cat has to share

Saturday, October 10, 2020

Adding a little more CRAZY to 2020

 Because a world-wide pandemic wasn't enough excitement this year, we decided to move across the country. Greetings from Northwest Ohio! We are here, but I wouldn't say we're settled. Almost ever thing is still packed, we're staying with family, both Oregon properties are sold and the Ohio flip is on the market. We're starting our due diligence on a distressed property, nothing like the flip, but it would still scare normal buyers. We'll see how it goes. 

What does everyone think of the new 2020-21 Core and Seasonal Sept/Oct Catalogs?!?!

I can think of several people who should be excited about all the mixed media items. I like all the paper suites and am IN LOVE with our Color of the Year Blue Belle!!


The other new colors are:

  • Desert Rose
  • Cinnamon
  • Scarlet
  • Flamingo
  • Grape
  • Avocado (which I can now spell correctly)
  • Sundance
Way before anyone knew about Covid, the CTMH Corporate Office was planning some exciting changes that took place on October 1. If you haven't checked out the new VIP Customer program, click the tab above. I think this is going to be perfect since Home Parties have been few and far between in general. Now that we're all 6 feet (or 2000 miles) apart, it's even more appropriate. Did you catch my new title? Consultant are now called Makers! I'm still consulting independently and running my business the way I want to, but the new name is kind of fun. Now, if I can only get somethings made!!

Share your crafty projects on my Facebook page! I need your creativity and inspiration. I have not been able to do much making but am going to break out my Craft with Heart Card Subscription ASAP. This is perfect for my life right now: everything is in the box and all I needed to find (which I did) was adhesive. 

I'm looking forward to getting together with you virtually and scheduled a Christmas Card class for October 24. See the details under Events to Join.

Sunday, December 15, 2019

Season to Sparkle


Join us in our monthly Technique Blog Hop during the Season to Sparkle! Go from blog to blog by following the links to see all the shiny art we have to share...


You've arrived from
Alyson Mayo's blog. If you get lost, Rudolph will light the way (or you can find a list on Melissa's blog).


This theme was hard for me because it's more along the creativity line, which is NOT my forte! At first, I wanted to use EVERY sparkly, shiny, glittery product we have; but I was able to refrain myself.


I looked at some of our fabulous How To books then I went to the CTMH Cricut Collections. Now that ALL of them are available to purchase, I had thousands of image choices!  So, which collection claims this image? One of the limited edition Christmas selections? No. A card from Artfully Sent? Nope. It's actually a page from Artbooking!!


I selected our White Glitter Paper for this layer. If you haven't tried it, there's no problem cutting it on the Cricut. I leave my machine on cardstock and use a standard mat, but not a new mat; it's like White Daisy Cardstock. If you cut a lot of glitter paper at one time, clean out your blade housing. I noticed this a few years ago when I cut pages of snowflakes.


I must have been making too many shaker cards lately because that's what I saw with the "window" in this image. I hid the holes in the page with the contour tool in design space. I had planned to mount the image on a card base so I sized it 1/4" smaller. But I didn't like the fancy corners on top of the square corners. I looked for a card shape to coordinate but didn't find one, so, I made one! I resized the image to card front size, duplicated the image, hid the window contours, and welded two together.

When I was picking out the sequin colors I kept going back and forth between silver and gold. I couldn't decide on a base color with either of these and the White Glitter Paper, so I added a backing to the window with Silver Foil Paper.


My card is finished off with White & Gold Skinny Ribbon. I decided to add it after the card was assembled so I used my ribbon trick: Whenever I want to save ribbon or when I need ribbon tied about a piece of paper, I tie it around a My Acrylix block first. That gives me a firm object to work with and I can snip the loop off center if the bow isn't going to be in the middle. I suggest using a block that's about twice the size of the paper (this was actually too big, but the one I had nearby). Keep the other end attached to the roll until you're finished also helps when making bows or tying knots.
Thanks for stopping by!!
Please leave a comment before you hop to Katy Taylor's blog.

Products Used:

  • White Glitter Paper
  • Silver Foil Paper
  • Sapphire Cardstock
  • 3-D Foam tape
  • Gold Sequins
  • White and Gold Skinny Ribbon
  • CTMH Artbooking Collection
  • Anti-Static Pouch
  • acetate or similar


Friday, November 15, 2019

Paper-Layering


Welcome once again to our monthly Technique Blog Hop. You may have arrived from 
Cat Scrapbooking. Be sure to check out all the posts by hopping to the next blogger until you get back to where you started. I'm sure you'll be inspired by the creativity, amazed by the artwork and/or learn something new.

If you get lost, a list of participants can be found here.


This month we are focusing on Paper Layering. This made me think of Cricut project with our fabulous collections. Did you know...ALL of the CTMH Collections are available for purchase?! This includes the two Christmas Collections:  City Sidewalks and Season of Joy.


I selection our newest collection, Complete Creativity, for my sample. I picked an 8.5x11 single page layout and adapted it to make a standard size card. Even though I know the math, it is easy to forget that the two sizes are in the same proportions. That means when you shrink an 8.5x11 down to 4.25x5.5, it's the same, just smaller!

There were a few elements of the layout I didn't need for a card, so I hid the photo mats and journaling boxes. I also switched the red to green and then swapped the bottom layer that appears as borders with the top mat layer.


Is is hard for you to image artwork in different colors?? It is for me! I selected the color palette from one of our new Paper Suites, Cedar and Pine. Did you know that the color swatches are in the catalog? I always find them helpful.


Here are the layers of the card when I assembled them. The very bottom is a blank card base. The trees are also layered! They cut as half circles and then are folded accordion style. These look great with our Two-Tone Cardstock!


After WAAAYYYY too many attempts to cut the sentiment in various sizes, I decided the best idea was to stamp the front of the card. (The part that says "tis the" is very fine.)  Ink can be a layer too!!

I actually found a stamp with a similar style! It's from the Holly Jolly - Cardmaking set.


I finished the card by accenting the stars with the Gold Shimmer Brush.  I wonder if I could make a layout from a card?? Do you re-size things in Design Space? Give it a try! Here is my DS file in case you're in a hurry.


One more word about the Close To My Heart Cricut products:  When shopping, always use your consultant's LINK to go to the Cricut web page. This is the ONLY way to find Complete Creativity. To find their link scroll all the way to the bottom of their web page where you'll find icons for various social media platforms. Click on the little green "C" square. If you don't have a consultant, I'd be happy to help you!

Please leave a comment below before checking out what Michelle Loncar has to share.