Showing posts with label holiday. Show all posts

Tuesday, December 15, 2020

Blissful Brackets - CTMH Technique Blog Hop


Welcome to December’s Technique Blog Hop. This month we are focusing on brackets. If you stumbled upon us, just click the links to hop from post to post until you end up here again. The complete list of participants can be found HERE.

If you’ve come from Brandi’s Blog, you’re in the right place.

It’s been quite a while since I participated in this hop. We went a little over-board with the go home idea and have been driving between Oregon and Ohio to finish a major remodel on an old house. That sale closed last week and now a family has a new home for Christmas! And we also decided to move back home to Ohio. After several months of living with relatives, we may have a new address in the new year.

Right now, most of our stuff is still packed. We couldn’t find warmer clothes so I had to do some shopping for coat, gloves, boots. The winter weather is different in Ohio than Oregon! I have more supplies unpacked than clothes, but still can’t seem to find the “one thing” I need. Here’s the card I made:


Brackets are a popular shape and pop up in a lot of different places, like this sticker from the Jingle Joy suite!

.

There are also quite a few bracket shapes in the Close To My Heart Cricut Collections. I pulled in several while I was planning my project, and even used Design Space to design this card. This is a 5x7 card. Here’s is the DS link for my file:  


I used Diamond Stickles to spice up the Raspberry strip. This technique is taught in the Jingle Joy Cardmaking workshop. 


The sticker was “unstuck” with the Anti-Static pouch and popped up with Thin 3-D Foam Tape. The regular thickness might have given it better dimension, so I went around the edge with Green Stickles. Since it was already attached, I slid the All-Purpose mat under the edge to protect the rest of my card.


If you don't have a Close To My Heart Maker (Consultant), you can shop from my website.

.

Perhaps you will see some of these other brackets during the hop. They gave me ideas for other projects. One of my favorite Cricut cuts this time of year is the gift card holder. The yellow shape is the gift card holder. The black rectangle represent a regular (credit card) size gift card. 


When I first used this shape, I wasn’t sure how to fold and glue it. The W diagram shows how to fold it. Put adhesive in between the two middle sections, just at the bottom edge(s) near the front and back sections. There needs to be space to slide in the gift card.


Making gift tags can be faster, simpler, and easier with brackets! Whether layered or not, just cut a sheet of these shapes then stamp “to” and “from.” 

These are standard size cards with a bracket cut out. I made 3x4 and 3.5x5 black rectangles to represent photos. You can use these cards when featuring a picture on your Christmas cards. Remember, you can always adjust the size of the opening, or the card itself, to fit you photo.

Please leave a comment before continuing to see what Cat has to share

Saturday, December 15, 2018

Love of Color - CTMH Technique Blog Hop


Welcome to the December Technique Blog Hop. You may have arrived here from Lauren's blog, just keep following the links, hopping from blog to blog until you complete the circle. Please leave comments; we really appreciate them!  If you get lost, a complete list of CTMH consultants participating this month can be found at the end of  Melissa's post, which is also your next stop!
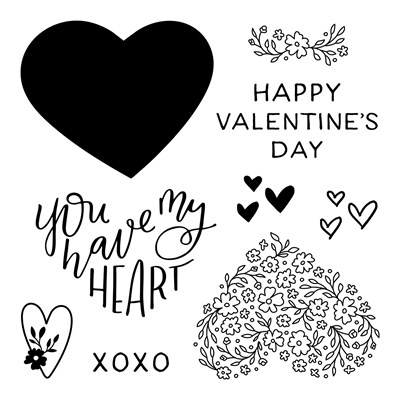
product imageSince we're nearing the end of the fall/winter holiday season, I wanted to jump ahead and bring your attention to a stamp set that may have escaped your notice. You Have My Heart is on page 101 of the Holiday Expressions catalog. It may be a little early for Valentine's but this is the last month to order from this book and I don't want you to miss out! The main images in this set are large, and the example is a scrapbook layout, but it still works for cards. It also has a nice sized, non-fluffy "Happy Valentine's Day" sentiment.
I was thinking pink since February is one of the few times a year I get to use it, so I looked in Love of Color for the section with Ballerina,  new to the palette this year. The four color suggestion is Ballerina, Sugarplum, Carolina and Pewter. When this guide was introduced at convention, they emphasized suggestion. It's not set in stone. We were encouraged to swap one shade for a similar one, so I did! Instead of Carolina, I used Mint (see the three color idea on the next page?). And I didn't stick to Pewter, just grey in general.

The card design is Pattern #7 from Make It From You Heart Volume 4 - Cardmaking (MIFYHV4#7). I enjoyed mixing the papers together for this card, something I almost never do. I plan to do mostly mixing with the papers from the next Seasonal Expressions. I pulled the Mint B&T from Oh What Fun and the Wood Grain is from the Seasons Mix-ins. Do you recognize the heart border? It's a Zip Strip, also from Season's Mix-ins!


When I was making this card, I thought I would have to choose between the floral pattern and the sentiment to go on top of the heart shape. But I was able to layer ALL 3! The solid heart shape is stamped in Ballerina. Next, I stamped the floral design in Sugarplum and finally, the sentiment in Pewter. Remember, when using large, solid stamps, it is especially important to use the "squishy thing" (or VersaMat™) under your paper when stamping.

The first mat is Sugarplum glitter paper. Did you know our glitter paper doesn't shed? You won't be covered in fairy dust after working with it. I know, that's not nearly as much fun, but some people have an issue with it. Another tip, save an old cutting blade to use just when cutting glitter paper. I'm not sure the glitter paper dulls the blade, but you don't need a nice, new, sharp one for glitter paper, so why risk it? I also have a separate one for Kraft paper. It's easy to label the blades with a Sharpie. I always pull my blade toward me on the SureCut™ Trimmer. Someone, maybe Fiskars, told me NOT to cut back and forth as it wears down the wire. I also like to know which way I am using the blade, so when I switch, or it jumps out, I know which way to put it back.


On the inside I stamped the sentiment and some of the smaller stamps. I colored the floral spray with the Sugarplum Shimmer brush and then picked up Mint with a Waterbrush for the leaves.

Thanks for stopping by. When you are done here, hop over to Melissa's blog and check out her idea. I'm sure it's brilliant!


If you aren't already working with a consultant, you can shop here.


Here's a list of the products I used:
  • D1796 You Have My Heart stamp set
  • Z6501 Ballerina ink
  • Z6500 Sugarplum ink
  • Z2832 Pewter ink
  • Z4189 Intense Black ink
  • Z6503 Mint ink
  • Z3224 Waterbrush - small
  • X7238B Oh What Fun Paper Packet
  • X9000 Seasons Mix-in Paper Packet
  • X6027 White Daisy cardstock
  • X5994 Ballerina cardstock
  • Z4188 Sugarplum glitter paper
  • Z4210 Shimmer Brush - Sugarplum
  • 1772 Ultra-Thin Glue Dots
  • X254 White Cards & Envelopes value pack
  • Z1836 Non-stick Micro-tip Scissors
  • Z3326 Tombow® Permanent Adhesive
  • 9045 Love of Color guide (don't forget an Everyday Life™ album too)


Thursday, November 15, 2018

Shake Things Up! - CTMH Technique Blog Hop


Welcome!! You have arrived at The Scrap Buzz from CTMH Craftings. Lauren is across the Pacific Ocean from me in New Zealand!! Keep clicking the links from blog to blog until you visit every in the circle.  If you get lost while globetrotting, there's a list of participants here.

Did you get last month's special, Holiday Sparkle? So cute!! That card kit was Cut Above® style, all the pieces were pre-cut. But the fun doesn't have to stop with that kit, this month's blog hop is showing ideas using the individual Shaker Card products.


For my card, I started with our new Cricut® Season of Joy Digital Collection.  The "Silent Night" card is pre-designed with all the layers, #M584FBE2. The four layers are attached at the sides to form an "M" shape. I have cut this before in standard size; this time, to accommodate the shaker, I made it 5x7. I removed "Silent Night" and replaced it with the "Oh Holy Night" image #M584F877. I made the base circle 3" to match the scale of the Shaker Window and Confetti Thin Cuts.

TIP: Remember to insert your scoring stylus when cutting the card overlays.

The Thin Cuts set comes with four dies:
  • base circle
  • star confetti
  • heart confetti
  • stitched ring for the top
The confetti dies are great for using up small, odd shaped scraps. If you don't have any scraps, you can run the same piece through your machine in different alignments. I added star confetti to the Loose Sequins in Silver. 


TIP:  Toss the Anti-static Pouch in with your sequins, re-seal and shake a little. Remove the pouch. It helps tame things down a bit.

Except for the base circle, the O Holy Night layers are on top of the acetate circle. After attaching the Sapphire phrase to the Carolina Blue piece, I highlighted the sentiment with Liquid Glass. I added Embellishing Thread to mimic the cardstock circles and sandwiched it between the cardstock and glitter stars with Micro Glue Dots. This was all secured to the top ring before placing it on the acetate.


Please leave a comment and let me know what you think of my project. Your next stop is just down the highway from here (literally), so head to duck-land and see what JAYMA has created for you!

Products Used:


Friday, September 1, 2017

Seasonal Expressions is HERE!!

I'm still excited about the new Annual Inspirations and now it's time for a new issue of Expressions! This one is our Seasonal Expressions as we head into the holidays.


Here are a few of the new products:

ADORABLE Cat and Bats for Halloween and more. Love the origami style images!! There's also matching images in the Cardmaking and Scrapbooking stamp sets (thin cuts available for both). I think the paper also coordinates nicely with the Constellations stamp set from Annual Inspirations. Are you doing an Eclipse layout??


The autumn paper is Falling for You and I can't wait to play with the Cardmaking stamp set...lined leaves designs...Should I emboss, color or maybe BOTH! The Scrapbooking set is similar but with flowers and stems. This paper is also great with the new  Gone Hunting stamp set as well as the September Stamp of the Month Feel So Blessed.


Remember, the next four months of SOTM are always in the back of the Expressions catalog. They are D size sets available for regular price $17.95 or only $5 with a qualifying $50 purchase. Stamp of the Month sets are only available for one month!


The traditional holiday collection is Beary Christmas. The cards below are from the Workshops Your Way Merriest Wishes Cardmaking Kit. Each of the Creative Collections has a card kit. Sometimes they go along with the theme of the paper, sometimes they do not. Remember, each of the cardstock weight Background and Texture Duos are double sided so you have two choices of patterns/colors. Even our single color cardstock now gives you choices: regular shade on one side, a lighter shade on the other.


Here's my favorite new stamp set, The Thought That Counts. So glad we need more tags this year. And I think I know some people on my gift list that may be getting some! 


Have you noticed that the metals are back in the color and design world? Silver and Gold is a great collection to use on its own or as neutrals to mix with colors. Note that the paper pack has 14 sheets as the gold foil designs are single sided.


 Be sure to check out the Events and Specials page for info on Classes and other new products.