Showing posts with label blog hop. Show all posts

Tuesday, February 15, 2022

Stunning Stencils - CTMH Technique Blog Hop


 Whether you arrived from CatScrapbooking or just stumbled upon us, WELCOME to TheScrapBuzz blog and this month's Technique Hop. We are using stencils for February; there are several new ones in the Core Catalog.  Follow the links to hop from blog to blog for techniques, tips, and artwork!
 
If you get lost, find broken links or have other issues, you can find a list of all this month's participants on Melissa's page. We have over a dozen CTMH Makers participating this time!  Be sure you are commenting so they know you appreciate their efforts and continue to share their projects!

I spend several days of quality time with one of three new Card Front Stencils, Pack #3.


Did you see this post on the Make It From Your Heart blog? I was having trouble with the diagonal stencil until I watched this video from that post. One thing I'll suggest is when you are sponging with our Exclusive Inks, is to use the corners of the stamp pad.  We usually ink stamps in the middle of the pad. Whenever I use small stamps, or sponges, I try to use the corners. As you'll see in Karen's video, press the sponge into the pad to absorb in, then pounce the sponge when the stencil wants to "wiggle."

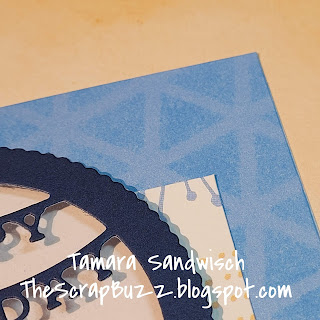
I made my own background paper with the diagonal lines then featured it with Pattern #18, from Volume #4 of Make It From Your Heart.


In between the lines, I stamped the little bee from the Sweet As Honey - Cardmaking stamp set.  


If, after completing this hop, you can decide which stencils to add to your crafting arsenal, ask your maker about bundles and how you can get them half-price. If you don't have a Maker, I would be happy to assist you!

After you leave a comment, hop over to see what Wendy has created this time. Thank you for stopping by!

Products Used:
Cardstock:  Black, Shortbread, Sundance, Mink
Exclusive Inks: Black, Sundance
Sweet as Honey paper pack


Saturday, January 15, 2022

Let's Get Geometrical - CTMH Technique Blog Hop


Whether you arrived from Danielle's page or just stumbled upon us, WELCOME to TheScrapBuzz blog and this month's Technique Hop. For January, we are focusing on Geometric Shapes/Patterns.  Follow the links to hop from blog to blog for techniques, tips, and artwork!
 
If you get lost, find broken links or have other issues, you can find a list of all this month's participants on Melissa's page. Our group is larger this month - how exciting!!  Be sure your are commenting so the Makers know you appreciate their efforts and continue to share their projects!

I was uploading digital images to my Cricut account recently, including Geometric Circle, and thought it would perfect for our theme.

I used a pattern called Circle Collection from one of our retired How To books called Wishes. It's also similar to this card from the current seasonal catalog.

 
The circle shape reminded me of one of the the Candid Moments papers, so I used that collection for my color palette and the patterned paper. It was hard to decide if I wanted to feature the triangle or circle on my project.


I used an extra image as a stencil and sponged onto the 5x7 card front with matching Carolina ink.


The circle made me think of shakers so I pulled out the Happy Birthday die. I was surprised that the orange Bitty Beads coordinated with the peach and papaya!  They look like sundance in my picture.

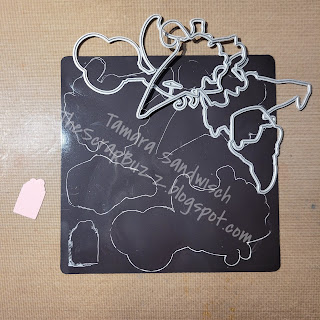
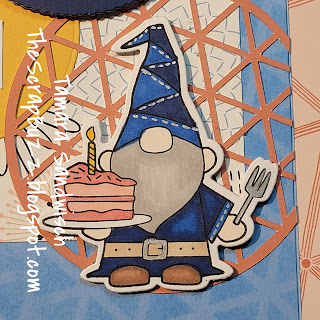
And now for some sad news:  While working on this card I discovered one of the Thin Cuts from my Party Gnomes set is missing. I know I had it several months ago. I looked for a while but it wasn't anywhere obvious. Perhaps it will show up on the bottom of an ink pad or in a pack of cardstock someday. I hope it didn't get tossed with paper scraps!!


Make sure this tragedy doesn't happen to you!!  Always put your Thin Cuts back onto the magnetic sheet (included with all Thin Cuts). I usually do, so I'm not sure what could have happened, other than the gift is smaller that the other shapes.  Another tip was shared by a Maker back when we carried chalk markers, but it works with White Gel Pens too!  (We featured the pens in our hop last month.)  Simply trace around your dies so you know they're all there when you put them away.  Be sure to let the ink dry before you move your shapes. I found the 0.8 size (medium) worked best for me.


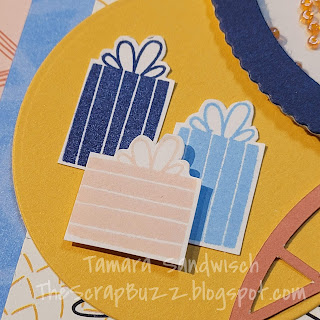
While fussy cutting the gifts, I realized I could easily make a present with the bow on a horizontal box by using a sticky note to Pick-and-Omit the stamp image.


This is the first time I used any of my Precious Metals Metallic Markers. I colored the fork and belt buckle, then added a little stitching here and there. These are definitely something I need to play with in the future!

Please scroll down and leave a comment then hop over to see what Maz has to share this month!

Wednesday, December 15, 2021

Accents of White - CTMH Technique Blog Hop

 You may have arrived from visiting Katy Taylor, be starting here, or have just stumbled in! Welcome!! Follow the links to hop from blog to blog for techniques, tips, and artwork!


This month we are featuring Accents of White in our monthly Technique Blog Hop. The White Gel Pens are fabulous!! I did not use any kind of white pen before we started carrying these, but I know many others have been clamoring for them for years. Close To My Heart is so awesome about listening to our requests, but they also wanted to make sure to find a quality product and reasonable price point.

Z1513 White Gel Pens

Like I said, this is all new to me.  One place I found coloring tips was in THIS video from CTMH's Facebook Live workshops. All their videos (and my few) are now listed on a separate blog PAGE. Please let me know if you find any broken links. It REALLY helps to see coloring technique in a video.

I also checked for other videos but did not find too much. One person said there was not a general consensus about storage of white pens. I am storing mine horizontally because they fit in my old Marker Cubby. The only other thing I do is wipe the tip off before and/or after use. I have not had any issues.

WHAT I KNEW BEFORE this blog hop was that you can use them to lighten the part of an image that receives the most light (from the imaginary light source). First I tried this on the Bear's scarf, but it just looks like icicles to me (great technique, wrong application). On the Reindeer, I tried this on the hat. I don't think it looks "right" either but you get the idea. 


WHAT I LEARNED was that you can go over parts of an image...on the Reindeer, I went over the *s that were stamped in black to change them into white *s!  I also added white to the ties on the neckerchief, so they look more like loops. 


The best part about this technique is that you can use it to fix mistakes! I went outside of the lines a bit on the Panda's scarf but going over it with one of the white pens made it disappear!! (I stamped on White Daisy Cardstock.)

It's so nice that the pens come with all three sizes! It doesn't take long to realize that SIZE MATTERS.  On the Fox, I did faux stitching on the scarf. The smaller size on the middle stripe looked too small. I like the other, thicker lines. (I also tried accenting the eyes - apparently this is not a thing. 😄 Neither above nor below improved the look.)


You can also see the difference on the Penguin's scarf. Left:  The first pen was too big. Right:  This time the smaller pen worked much better. I also like the one \ added vs the V marks.


When I added dots to the pom poms, I thought if the large hat ball looked good using the 1.0 size, then the smaller side balls would work well with 0.5. Nope. The small dots are too hard to see IMO. Which is another tip:  START SMALL. You can always go over accent marks with a larger pen.


I thought adding extra lines to the Panda's collar made it look furrier.  I also filled in the holes for the strings so that they looked like...holes. 

I embellished my card using the Snowflake Loose Sequins. It was really nice to have the Quickie Glue and Pick-Up Tool!  You do need to be quick with the Quickie Glue! It was perfect for sequins but if you need more than a dot, it will dry before you get anything attached. The Pick-Up Tool is out of stock right now but coming back soon! You can find it on page 91 in the Core Catalog.


My card pattern is from the Hip Hip Hooray Workshop, a VIP exclusive! I colored the adorable critters from If Snowflakes Were Kisses images using the TriBlend Markers. 

Here are colors I used:
for Wisteria - Hydrangea Blend
for Glacier - Vintage Blue + Aqua Blue
for Mulberry - Antique Pink + Dusty Purple*
Muted Brown
Ice Grey Blend

*There is no official matching formula, yet, so I used the Swatch Chart to figure out the mix. Also, here's the Marker Color Chart link.

For more White Gel Pen ideas, check out the Wonderland Cardmaking Kit , (but check it out soon, they're almost gone!) Then join us for the Facebook Live event where I'm sure we'll hear even more about these.

Head over to see what Melissa Robinson has created. She also has the list of all this month's participants in case you get lost or find a broken link.

How do or will you use White Gel Pens? Please leave a comment below!!

PRODUCTS USED
  
Z4390 If Snowflakes Were Kisses
D2059 Stamp Set only, no dies

X7274B Wonderland Paper Pack

Z4319 Snowflake Loose Sequins

 
Z1512 Quickie Glue Pen 


Monday, November 15, 2021

Silver & Gold Technique Blog Hop

Welcome to The Scrap Buzz and this month's edition of the Technique Blog Hop. You have arrived from visiting Judy. Keep following the links to visit all of the participants. If you get lost, a Colette list can be found on Melissa’s page. This month we are featuring Silver & Gold.

This month, I put a little TECH in the technique hop. My project is not paper, it's fabric and vinyl! DID YOU KNOW Close To My Heart offers heat transfer vinyl (HTV)? It can be found under Specialty Paper (although it's not paper). You can do things with vinyl that can also be done with paper, including cutting it with a Cricut, Silhouette, etc. HTV can be used for things where paper wouldn't work or be permanent such as, to decorate the front of scrapbook albums, personalize items, and MAKE SHIRTS! 

In addition to our Cricut Collections and other Cricut images, you can also upload other types of images to Design Space. DID YOU KNOW, Close To My Heart offers digital art in the form of SVGs? 

What is an SVG file? An SVG file, short for scalable vector graphic file, is a standard graphics file type used for rendering two-dimensional images on the internet.

To me, that translates as, “works with electronic cutting machines!”  You can find the images offered on your makers website by going to SHOP, then to the Digital Art category. Individual images are only $1, plus there’s no shipping! I used the Craft Queen image for my shirt and cut it from our Silver Glitter HTV. (Note:  I pre-washed my shirt.) In case you missed it, the coordinating die cut for the paper suites are now SVG (instead of specifically Cricut images), so they're now more usable to more people!

Sometimes a special promotion will include an SVG, such as the new Merry Making ornaments. Once you purchase an ornament product, the SVG files are added to your digital library automatically. You can have your glitter paper cut and ready to adhere to the ornaments as soon as they arrive!! I've heard a lot of questions about where to find Digital Art after purchase.  Access your digital library from your Maker's website by clicking on your name to open the drop down menu. From there, click on account. On the left side, (or new drop down menu), select Digital Library. All of your purchased images will be here. Click on the blue download icon to add them to your device.

The next question is always "How to do I upload Digital Art to Cricut Design Space?" Here's a step-by-step:

  1. Open the Cricut App on your PC [or Apple device]. Start a NEW PROJECT.
  2. Click on UPLOAD.
  3. UPLOAD IMAGE with Drag & Drop or [BROWSE FILES] and select your downloaded image.
  4. You may with to give your image a name (and tag with keywords). Click UPLOAD [SAVE].
  5. Your new image will now show under Recent Uploads [Images]. Click on it and ADD TO CANVAS [INSERT].
  6. Next time you want to use this image, click on UPLOAD, then look for it under Recent Uploads, or View All [Open Uploaded Images]. You can also search for it with one of your keywords. 
  7. Resize your image as desired.
  8. MAKE IT.
  9. If the preview looks like all of the parts of your images are being cut separately, and not spaced correctly, CANCEL to go back to the [CANVAS], then select the entire image, and [ACTION] ATTACH. Continue with MAKE IT. (Note:  this is for single color images. For layered images, each color needs to be attached separately.)
  10. For HTV, be sure to MIRROR [on CANVAS, EDIT, HORIZONTAL] the image so that it's backwards.
  11. Put vinyl shiny side down on your mat. 
  12. Use Vinyl setting on your machine. CONTINUE and cut image.
  13. Weed the vinyl.
  14. Follow Easy Press/iron instructions. Here is an online Heat Guide and a printable version.  For CTMH's vinyl FAQ sheet, click here.
  15. Pre-heat Easy Press/iron.
  16. Make sure there are no wrinkles in fabric, or other item is flat and stable.
  17. Pre-heat the base item to which you are adding the vinyl.
  18. Lay Vinyl on your base, shiny side up this time (so you can read it), check placement.
  19. Heat the vinyl as directed. 
  20. Heat the image from the backside of a shirt too.  This isn't necessary on an album.
  21. Check adhesion. Reheat for a few seconds if needed.
  22. Remove plastic backing when directed (hot or cold).

Think of all the fun crafts you can make for the holidays using HTV:  matching family shirts, monogrammed napkins, personalized gifts, and of course, albums! 

A few years ago, I made this video to show how to put vinyl on an album. The vinyl image shown in the video is from  These Are My People kit.

I have been asked to do a live video showing how to size images in Cricut for items like the Merry Making ornaments, so watch my Facebook page for that!  I think it will be a Zoom video because I think I can do the screen share thing! (We'll find out.)

 Before you go on to see what Katy is sharing, please leave a comment. If you do not have a Maker, let me know how I can help, and check out my website.


Wednesday, September 15, 2021

Make it Shine! - CTMH Technique Blog Hop


Welcome to The Scrap Buzz! For this month’s Technique Blog Hop we will Make It Shine! You may have arrived from visiting Lauren Moore's page; or, if you just stumbled in, hop from blog to blog using the links to see all of the ideas and art work. If you get lost or find any broken links, a full list of participants is on Melissa Robinson's blog.

Let Me Show You How to add shine to any artwork. I took this card from the September/October catalog and made a few adjustments. Did you know...that you can find the recipes for all the catalog artwork? Here is the link for the September/October catalog.


This stamp set is called Peace and Love. I think it will be good for not only Christmas, but babies, get well, sympathy and even Valentine's with that cute heart! 

The first thing I did was to replace the Evergreen Cardstock with Evergreen Glitter Paper. Easy Peasy, right? We have 15 colors of glitter paper and I love that it doesn't shed glitter everywhere! It also works great with die cutting and Cricut. TIP:  Don't use a brand new Cricut mat with glitter paper.


I think the catalog card used Watercolor Paints for the background. I'm still working on my skill set for that technique so I used a sponge with Glacier Ink.  Next, instead of using a Waterbrush to blend the Watercolor Pencils, I used Shimmer Brushes! Did you know you could do that? I used Lemonade on the stars and Clear everywhere else. Exciting News:  shimmer brushes will start to come labeled with the name of the color; YIPPEE!!


It's a little tricky to photograph shimmer. I hope you can see on some of these pictures how much it sparkles.


There were a couple of other changes I made. Instead of a sewing machine, I used my Piercing Tool and the technique shown in the White Pines Scrapbooking kit. I made a video class for that workshop and you can find it in my Virtual Craft Room on Facebook.

I played with the Autumn Loose Sequins and discovered a few things about the new Loose Gems (clear gems are in this collection).

 I used the Micro Glue Dots to attach the Clear Loose Gems. Depending on which way you place them, they do offer different looks.


With the point down, they look clear.


With the point up (easier to attach), they are opalescent. I put mine point up. Watch for more Autumn Sequin info on my Facebook page.

I used Thin 3-D foam tape to raise the Evergreen layer, the cloud and the angel. The sentiment is flat but the gems are the same height as the cloud and angel.


If you need a consultant, you can contact me for help and/or shop from my website.

Please leave a comment below before hopping over to see more Shiny art from Maz Wood.