Showing posts with label card making. Show all posts

Monday, September 8, 2025

Welcome Fall!!

It may not officially be Autumn but I am enjoying the not-hot weather!  What is your go-to fall activity?  Football??  Yard & Garden work??  Back to School Chaos!?!

If is seemed like I was AWOL recently, it's because hubby and I finally took a vacation!  After dealing with his mom's health crisis and over-working on the project house, it was long over due.  Thanks to our kids who made the whole thing easy.

DS#1 and his wife have caught the cruising bug and decided last year to do the Alaska Inside Passage trip.  Since DS#2 and his wife live near Seattle (the departing port) we were able to see everyone at once!!

Here is the latest Stampin' Up! news:

New Mini Catalog for September-December is now live!  If you recently purchased from me, you should have received a copy in the mail.  Copies can be added to your order (#168028) or viewed online.  

To find catalogs online, go to my website and scroll all the way to the bottom of the main page.


New Online Exclusives have also arrived this month.  More information on finding those is under SPECIALS.

Be sure to register for the FREE virtual class being held on World Card Making Day, October 4.   Featured will be one of this month's additions to the Kit Collection. This day is also the FREE crop at the public library in Wayne, Ohio.  If you need any supplies, including the Handmade & Heartfelt Kit, let me know by the 15th and we can share shipping.  RSVP for the crop with me or the library so there is enough room for everyone.

#WorldCardMakingDay25


Wednesday, September 15, 2021

Make it Shine! - CTMH Technique Blog Hop


Welcome to The Scrap Buzz! For this month’s Technique Blog Hop we will Make It Shine! You may have arrived from visiting Lauren Moore's page; or, if you just stumbled in, hop from blog to blog using the links to see all of the ideas and art work. If you get lost or find any broken links, a full list of participants is on Melissa Robinson's blog.

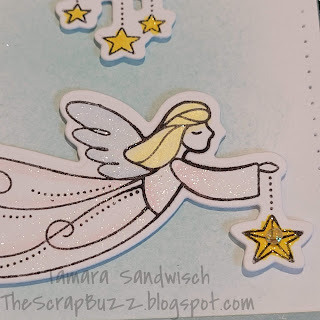
Let Me Show You How to add shine to any artwork. I took this card from the September/October catalog and made a few adjustments. Did you know...that you can find the recipes for all the catalog artwork? Here is the link for the September/October catalog.


This stamp set is called Peace and Love. I think it will be good for not only Christmas, but babies, get well, sympathy and even Valentine's with that cute heart! 

The first thing I did was to replace the Evergreen Cardstock with Evergreen Glitter Paper. Easy Peasy, right? We have 15 colors of glitter paper and I love that it doesn't shed glitter everywhere! It also works great with die cutting and Cricut. TIP:  Don't use a brand new Cricut mat with glitter paper.


I think the catalog card used Watercolor Paints for the background. I'm still working on my skill set for that technique so I used a sponge with Glacier Ink.  Next, instead of using a Waterbrush to blend the Watercolor Pencils, I used Shimmer Brushes! Did you know you could do that? I used Lemonade on the stars and Clear everywhere else. Exciting News:  shimmer brushes will start to come labeled with the name of the color; YIPPEE!!


It's a little tricky to photograph shimmer. I hope you can see on some of these pictures how much it sparkles.


There were a couple of other changes I made. Instead of a sewing machine, I used my Piercing Tool and the technique shown in the White Pines Scrapbooking kit. I made a video class for that workshop and you can find it in my Virtual Craft Room on Facebook.

I played with the Autumn Loose Sequins and discovered a few things about the new Loose Gems (clear gems are in this collection).

 I used the Micro Glue Dots to attach the Clear Loose Gems. Depending on which way you place them, they do offer different looks.


With the point down, they look clear.


With the point up (easier to attach), they are opalescent. I put mine point up. Watch for more Autumn Sequin info on my Facebook page.

I used Thin 3-D foam tape to raise the Evergreen layer, the cloud and the angel. The sentiment is flat but the gems are the same height as the cloud and angel.


If you need a consultant, you can contact me for help and/or shop from my website.

Please leave a comment below before hopping over to see more Shiny art from Maz Wood.


Saturday, May 15, 2021

Just Distress Oxide it! - CTMH Technique Blog Hop


 Welcome to the May 2021 Technique Blog Hop!  If you get lost, or find a broken link, you can get the list of participants on Melissa's page.  You may have arrived from Brandi's page. Complete the hop by following the links from blog to blog so you don't miss any of the artwork.


FYI I am storing my Distress Oxide inks in a My Acrylix Mini Stamp Organizer. There is room for my blending tools too! The foam circles are on a piece of velcro inside a cabinet. Some people put them on the underside of the organizer lid.


I selected three bright colors and blended them to get five colors. After my first test sample I wasn't sure how many more attempts I would need, so I used a 5.5" x 12" piece of White Daisy Cardstock. That gave me at least two card fronts plus extra for mistakes or testing.


After applying and blending the ink on the cardstock, I sprayed it with a little water to get some oxide areas. I made sure my piece was dry, then ran it through my CTMH machine with the Celebrate Embossing Folder


Finally, I sanded the raised areas to pop the white cardstock words.

I feel like I need to embellish my card, but there isn’t really room. Shimmer brush maybe?? I tried some black splatters on one sample, but I didn’t like it. Bitty sparkles?? Leave me your suggestions in the comments!

Your next stop is to visit is Lauren.

Tuesday, December 15, 2020

Blissful Brackets - CTMH Technique Blog Hop


Welcome to December’s Technique Blog Hop. This month we are focusing on brackets. If you stumbled upon us, just click the links to hop from post to post until you end up here again. The complete list of participants can be found HERE.

If you’ve come from Brandi’s Blog, you’re in the right place.

It’s been quite a while since I participated in this hop. We went a little over-board with the go home idea and have been driving between Oregon and Ohio to finish a major remodel on an old house. That sale closed last week and now a family has a new home for Christmas! And we also decided to move back home to Ohio. After several months of living with relatives, we may have a new address in the new year.

Right now, most of our stuff is still packed. We couldn’t find warmer clothes so I had to do some shopping for coat, gloves, boots. The winter weather is different in Ohio than Oregon! I have more supplies unpacked than clothes, but still can’t seem to find the “one thing” I need. Here’s the card I made:


Brackets are a popular shape and pop up in a lot of different places, like this sticker from the Jingle Joy suite!

.

There are also quite a few bracket shapes in the Close To My Heart Cricut Collections. I pulled in several while I was planning my project, and even used Design Space to design this card. This is a 5x7 card. Here’s is the DS link for my file:  


I used Diamond Stickles to spice up the Raspberry strip. This technique is taught in the Jingle Joy Cardmaking workshop. 


The sticker was “unstuck” with the Anti-Static pouch and popped up with Thin 3-D Foam Tape. The regular thickness might have given it better dimension, so I went around the edge with Green Stickles. Since it was already attached, I slid the All-Purpose mat under the edge to protect the rest of my card.


If you don't have a Close To My Heart Maker (Consultant), you can shop from my website.

.

Perhaps you will see some of these other brackets during the hop. They gave me ideas for other projects. One of my favorite Cricut cuts this time of year is the gift card holder. The yellow shape is the gift card holder. The black rectangle represent a regular (credit card) size gift card. 


When I first used this shape, I wasn’t sure how to fold and glue it. The W diagram shows how to fold it. Put adhesive in between the two middle sections, just at the bottom edge(s) near the front and back sections. There needs to be space to slide in the gift card.


Making gift tags can be faster, simpler, and easier with brackets! Whether layered or not, just cut a sheet of these shapes then stamp “to” and “from.” 

These are standard size cards with a bracket cut out. I made 3x4 and 3.5x5 black rectangles to represent photos. You can use these cards when featuring a picture on your Christmas cards. Remember, you can always adjust the size of the opening, or the card itself, to fit you photo.

Please leave a comment before continuing to see what Cat has to share

Thursday, November 15, 2018

Shake Things Up! - CTMH Technique Blog Hop


Welcome!! You have arrived at The Scrap Buzz from CTMH Craftings. Lauren is across the Pacific Ocean from me in New Zealand!! Keep clicking the links from blog to blog until you visit every in the circle.  If you get lost while globetrotting, there's a list of participants here.

Did you get last month's special, Holiday Sparkle? So cute!! That card kit was Cut Above® style, all the pieces were pre-cut. But the fun doesn't have to stop with that kit, this month's blog hop is showing ideas using the individual Shaker Card products.


For my card, I started with our new Cricut® Season of Joy Digital Collection.  The "Silent Night" card is pre-designed with all the layers, #M584FBE2. The four layers are attached at the sides to form an "M" shape. I have cut this before in standard size; this time, to accommodate the shaker, I made it 5x7. I removed "Silent Night" and replaced it with the "Oh Holy Night" image #M584F877. I made the base circle 3" to match the scale of the Shaker Window and Confetti Thin Cuts.

TIP: Remember to insert your scoring stylus when cutting the card overlays.

The Thin Cuts set comes with four dies:
  • base circle
  • star confetti
  • heart confetti
  • stitched ring for the top
The confetti dies are great for using up small, odd shaped scraps. If you don't have any scraps, you can run the same piece through your machine in different alignments. I added star confetti to the Loose Sequins in Silver. 


TIP:  Toss the Anti-static Pouch in with your sequins, re-seal and shake a little. Remove the pouch. It helps tame things down a bit.

Except for the base circle, the O Holy Night layers are on top of the acetate circle. After attaching the Sapphire phrase to the Carolina Blue piece, I highlighted the sentiment with Liquid Glass. I added Embellishing Thread to mimic the cardstock circles and sandwiched it between the cardstock and glitter stars with Micro Glue Dots. This was all secured to the top ring before placing it on the acetate.


Please leave a comment and let me know what you think of my project. Your next stop is just down the highway from here (literally), so head to duck-land and see what JAYMA has created for you!

Products Used:


Wednesday, September 19, 2018

One Card Pattern, Three Ways

I am loving the September Stamp of the Month!


I started with the pattern from the Grateful Heart Cardmaking Kit, You Got This, and substituted the stamp set and embellishment. That was so painless, I repeated the idea with other stamps from Just Treats and the papers from Oh What Fun and 'Tis the Season.

Monday, July 2, 2018

News from Convention

The first bit of news is an adjustment to our Idea Book publication. We will have three issues of Seasonal Expressions, just like before, except that they will include all the current products so there's only one catalog per cycle. There will no longer be a large Annual Inspirations, year long book.  With this modification, the current Annual Inspirations will continue through August 31, 2018. Keep in mind that, as always, some products may sell out as we approach the retirement date, so shop early!

The NEW Holiday Expressions that was revealed to consultants at our annual convention this past weekend, will begin September 1, 2018 and run through December 31, 2018. This is the same Expressions schedule we have had for the "small books." The catalog has been beefed up and actually has more pages than last year's Annual Inspirations.

Let's talk colors! It should be no surprise that Bashful, the current Color of the Year will be departing to the great palette in the sky, but never fear, a new shade is on it's way! If you love this delicate pink though, don't be shy, make sure you order the re-inker for your stamp pad and stock up on the cardstock and glitter paper. 
10 additional colors will be leaving to make room for 10 new shades. Gone in the new CTMH year will be:
  • Crystal Blue
  • Juniper
  • Flaxen
  • Sorbet
  • Pacifica
  • Tangerine
  • Blossom
  • Cranberry
  • Poppy
  • Nutmeg

The mini-pigment pads are discontinued. Full size pigment pads are coming in select colors.

The Fundamentals line is retiring.

Be sure to keep an eye on my cloud based Retiring List where I've added notes and will update you as products sell out.

One of the many highlights of convention this year was having Stacy Julian, former DOTS consultant, back with us. Her new product line, Story by Stacy, expands in the 2018 Holiday Expressions. She made a quick video to give you a peek. When you're shopping STAMPAGANZA this month, be sure to add Colorful Texture and Quotable Words to your cart. Not only will you be able to get a 3rd stamp set FREE, but prices will be going up slightly on stamp sets for the first time ever.

Stay tuned for more updates and info on new products!!

More questions? Leave a comment!

Saturday, June 23, 2018

2018 Retired List

The corporate office has released the retired list.


The big catalog aka Annual Inspirations 2017-18 is valid for 1 year. As we approach July 31, 2018, some items may sell out, so shop early!

The new Annual Inspirations 2018-19 will post and go live August 1, 2018. Contact me for a physical copy.


Our small catalogs aka Seasonal Expressions run for four months each.

The current issue runs through August 30, 2018.


You can still find several items from the January-April Expressions for sale while supplies last under the Going Soon area of my website.


Click here for the retired list in PDF format.

Click here to link to the list in Excel format. This is the list I will keep up-to-date as items sell out.


Wednesday, April 4, 2018

Tips for adhering vellum

You've probably heard that "everything old is new again." That's true for clothing styles and scrapbooking trends. We carried vellum years ago, then it disappeared for a while and now it's back. The age old question that arises next is how to adhere vellum without the adhesive showing through. Below you can see two examples: the one on the left is a dry, dotted adhesive. The other is Bonding Memories used wet. Both show through the vellum.


The easiest way to use vellum with adhesive is to hide it: behind embellishments, die cuts, solid papers, etc. One the leaf card I was able to hid it behind the foil stripes by using our Bonding Memories Glue Pen and "drawing" the glue behind the stripes.                                                        

Bonding Memories is a two-way glue. When wet (blue) it's a permanent bond; when dry (clear) it's a temporary bond. Clear is exactly what you want to adhere vellum! For this translucent vellum (below) I put the glue on the top and bottom edges, let it dry, then attached. Can you see the glue? This is a page for a mini album so the paper and vellum won't be handled.


ICYMI: Here's CTMH's blog post from a while ago about attaching vellum.

Friday, February 16, 2018

Giveaway!!

I love my customers, so since we just celebrated Valentine's Day, I'm doing a giveaway! Comment, share or follow my blog (let me know) and I'll enter you for a chance to win. I'm giving away a brand new stamp set, Live, Laugh, Love, a popular Stamp of the Month from last May. I'll also include some paper surprises. A random drawing of entrants will be March 17. Are you feeling lucky?


Product Spotlight: ALL-PURPOSE MAT


If you haven't seen this product, take a second look!

Do you have grit all over after embossing from stray embossing power flying all over? Then you need the All-Purpose Mat! The one side of the mat is tacky: that keeps it from sliding around when you're using the non-stick side, but it also works face up to hold onto extra embossing power. The mat is heat resistant to 240 degrees F.


Do you end up with stickiness on your work surface from "over-gluing?" Then you need an All-Purpose Mat! Glue wipes right off the non-stick side!!  Wet glue, dry glue, tape glue, glue dots, it just wipes off giving you a clean work surface. This is especially helpful for small and randomly shaped pieces like Cricut cuts.

This non-stick side is also useful for wet techniques. Use it under your paper when using the spray pen. Mix watercolors or use as a palette for reinkers. Check out this fun technique.

And here's a video so you can see the All-Purpose Mat in action.


Shop for your mat and other items here.