Wednesday, September 15, 2021

Make it Shine! - CTMH Technique Blog Hop


Welcome to The Scrap Buzz! For this month’s Technique Blog Hop we will Make It Shine! You may have arrived from visiting Lauren Moore's page; or, if you just stumbled in, hop from blog to blog using the links to see all of the ideas and art work. If you get lost or find any broken links, a full list of participants is on Melissa Robinson's blog.

Let Me Show You How to add shine to any artwork. I took this card from the September/October catalog and made a few adjustments. Did you know...that you can find the recipes for all the catalog artwork? Here is the link for the September/October catalog.


This stamp set is called Peace and Love. I think it will be good for not only Christmas, but babies, get well, sympathy and even Valentine's with that cute heart! 

The first thing I did was to replace the Evergreen Cardstock with Evergreen Glitter Paper. Easy Peasy, right? We have 15 colors of glitter paper and I love that it doesn't shed glitter everywhere! It also works great with die cutting and Cricut. TIP:  Don't use a brand new Cricut mat with glitter paper.


I think the catalog card used Watercolor Paints for the background. I'm still working on my skill set for that technique so I used a sponge with Glacier Ink.  Next, instead of using a Waterbrush to blend the Watercolor Pencils, I used Shimmer Brushes! Did you know you could do that? I used Lemonade on the stars and Clear everywhere else. Exciting News:  shimmer brushes will start to come labeled with the name of the color; YIPPEE!!
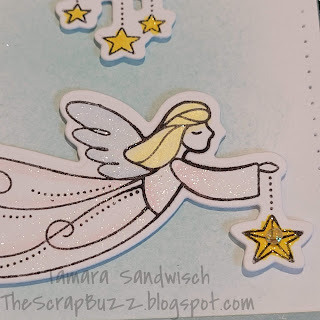


It's a little tricky to photograph shimmer. I hope you can see on some of these pictures how much it sparkles.


There were a couple of other changes I made. Instead of a sewing machine, I used my Piercing Tool and the technique shown in the White Pines Scrapbooking kit. I made a video class for that workshop and you can find it in my Virtual Craft Room on Facebook.

I played with the Autumn Loose Sequins and discovered a few things about the new Loose Gems (clear gems are in this collection).

 I used the Micro Glue Dots to attach the Clear Loose Gems. Depending on which way you place them, they do offer different looks.


With the point down, they look clear.


With the point up (easier to attach), they are opalescent. I put mine point up. Watch for more Autumn Sequin info on my Facebook page.

I used Thin 3-D foam tape to raise the Evergreen layer, the cloud and the angel. The sentiment is flat but the gems are the same height as the cloud and angel.


If you need a consultant, you can contact me for help and/or shop from my website.

Please leave a comment below before hopping over to see more Shiny art from Maz Wood.


Sunday, August 15, 2021

Anything Goes - CTMH Technique Blog Hop


Welcome to The Scrap Buzz! For this month’s Technique Blog Hop…Anything Goes! If you’ve arrived from visiting Lauren Moore, you’re on the right track! If you get lost or find any broken links, a full list of participants is on Melissa Robinson blog.

Wander layout by TheScrapBuzz

I was having trouble coming up with a card, or smaller project, so I decided to make a Scrapbooking layout using Wander Paper Pack and Sticker Sheet. Our youngest son and his fiancé are off on another hiking/back packing adventure this weekend so there are always outdoor pictures to scrap.


The layout is Design #11 from our newest How To book, Make It From Your Heart, Volume 5. Similar to Volumes 1 and 2, this book contains designs for both layouts AND cards. The construction on Volume 5 is identical to that of Volume 3 and 4: heavy-weight, coated pages with holes so you can place it in one of our 6x8 Everyday Life albums. (Note: Volume 2 is almost sold out. I don’t know if it will be re-printed or re-published.)

The Sundance pieces at the bottom are zip strips. I used up some of my remaining stickers and also had some left-over Wander Die-Cuts to use. Did You Know…these are printed, perforated chip board pieces and the designers really did a great job filling in all the spaces with frame and shapes.

Wander layout by TheScrapBuzz.

Some of my embellishments are images that I stamped with the Take A Hike stamp set. It is also available with Thin Cuts. This is a fun outdoor themed set that I’m sure I’ll be using over and over with several paper suites! I used multiple techniques on these pieces. The paprika backpack is my attempt at copying the haphazard way the pattern paper is colored. I used a water brush and ink from the lid of my Paprika stamp pad to make a colored, oval blob on White Daisy Cardstock. Then, I stamped the backpack image on top using Black EI ink.

Wander layout by TheScrapBuzz

The blue back pack and water bottle were stamped with Sapphire EI Ink on Glacier cardstock. The green water bottle was stamped in Sage using the BACK of the stamp. This makes a solid image. Then I stamped it normally using Evergreen EI ink. This is a great way to “color” outline stamps that are left and right symmetrical, or very close. Flower stamps are fun even if they aren’t perfectly matched because you get that haphazard coloring look that this paper suite features.

I also brought in the current Mix In papers. These are truly one of my favorite products because of their versatility. Not only do they stand alone, but also coordinate with the two paper suites in the bi-monthly catalog they share. Don’t over look these from other catalogs if they are still available! And, if you see them on a flash sale, snap them up!! There are six double sided sheets per pack (12 patterns), which is a nice sample size, or grab two acts so you have two matching sheets for layouts, or one full sheet to use of each pattern.
Wander layout by TheScrapBuzz

For my title, I used a 4x6 Wander PML Card but it was too tall for the layout design…I could have adapted the page, but I adapted the card instead. I cut a piece of Peacock Cardstock the size specified in the design. Then, I trimmed the card a bit so the cardstock would show as a thin border. I love the two lines of stitching and didn’t want to just trim the PML shorter. By cutting the card where the colors change, I could layer the two pieces to make it look like one card. The white space is a good place to add the date and location for the adventure pictures that will be added.

Wander layout by TheScrapBuzz

I also did some paper piecing, by stamping the same image in several colors, then fussy cutting the images and reassembling some of the shape together for one embellishment.

Thanks for stopping by; please leave a comment below. Next, hop over to see what Katy Taylor is sharing this month.